Case Study 2: Creating a P2P Connection
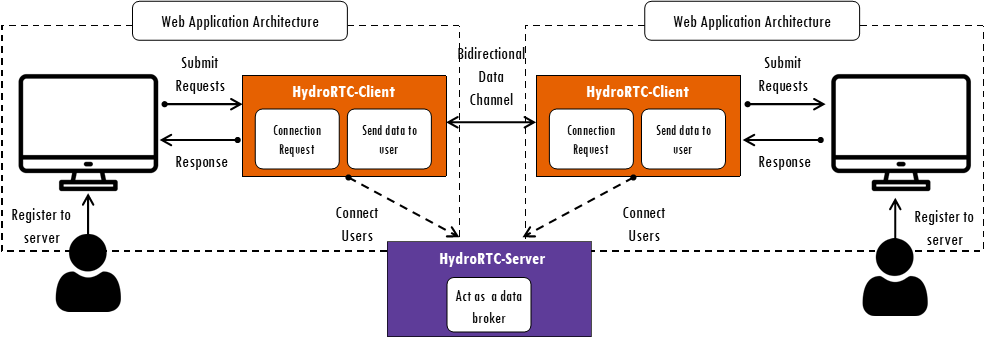
This tutorial will show to create a P2P connection utilizing the same sever instance as in the previous case study, with slightly different configuration in terms of visual styling.
Objectives
- Introduce students to the concept of peer-to-peer communication
- Have a bidirectional channel through the use of the implemented mechanisms using HydroRTC.
- Interface with the data through the implemented handlers from the server.
User Interface
The boilerplate code provided in the examples is a simple chart interface that creates an overlay allowing users to login to the server.
<div id="overlay">
    <div class="overlay-box">
        <h2>Enter your username:</h2>
        <input type="text" id="username" placeholder="Username" />
        <button id="connect">Join Chat</button>
    </div>
</div>
//And the rest of the code for the chat
The data used will depend on the contents of each user's local storage. For now, we will be showing how to stream data on the fly so it is received by the end user without any server interaction.
We will be using ArrayBuffers to transfer data, so it doesn't matter what the data looks like, we will showcase how to transfer it at different rates using only browser communication.
Once the client connects, we declare the following listeners from the user interactions:
let hydroRtcClient = null;

let textInput = document.getElementById('messageInput');

let messageBox = document.getElementById('messages');

let userlist = document.getElementById('users-list');

let selectedPeer = document.getElementById('users-list');

let fileInput = document.getElementById('fileInput');
Connections between Peers
A list of peers is automatically updated by the users whenever there is a new user added to the server. The connection between one use and the other is established through the declaration of connection from a requestor to a requestee. This is done through the following command:
//The requestor ask from a list of connected peers to connect
let dataStream = hydroRtcClient.requestDataFromPeer(selectedPeer, 'data')
        // null, if client is unable to send the request
        if (dataStream != null) {
            //Whenever there is a data request, listen to that
            dataStream.on('data', (data) => {
                //Save any data available on submission by the requestee
                data.chunkArray ? receivedData.push(data.chunkArray) : null
                //Additional handlers
            })
        }
Once the submission is sent, the requestee accepts the requests through the following handler:
//Make the connection between the peers once requested
let eventEmitter = await hydroRtcClient.connectPeer(selectedPeer)
        //Peer-to-peer channel is now open, same as before
        if (eventEmitter != null) {
            eventEmitter.on('data', (data) => {
                data.chunkArray ? receivedData.push(data.chunkArray) : null
            }
        }
        //Other handlers
Sending Data
The type of data the connected peers submit is agnostic of the connection, since everything is transformed into smaller chunks of memory that are transferred into an object containing the data. This can afterwards be saved in the database through the use of the browser's database storage, or directly used for manipulation.
To start a submission, the user grabs data from their local storage using the fetch button, which triggers the use of the the implemented data grabbers on the client.
document.getElementById('send-file').addEventListener('click', async () => {
        try {
            console.log('Data has been fetched.')
            //The file is grabbed by the user and the submission starts
            //The following function sends data based on a specified chunk size in MBs
            //The user can modify this based on bandwidth
            hydroRtcClient.getfileData(fileInput, 0.2);
        } catch (error) {
            console.error('Error', error)
        }
    })
The data can be of any type, so the bidirectional channel is multipurpose!
Receiving Data
On the user's end, the data is saved in a variable called
receivedData, used to stored the buffers. The user receives
a message on screen or console that the transmission has finished.
//Stored data
let receivedData = [];

//Once data has arrived, concatenate the buffers
receivedData = hydroRtcClient.concatenateResults(receivedData)
The data can be saved afterwards using the available database:
hydroRtcClient.addDataToDB({id: 'someID', data: receivedData})
More About Databases
Notice how these are buffers of memory, not something readily available for visualization or manipulation. Depending on the type of data obtained, the different handlers can be used to interface them by sending them to the server, and receiving back relevant information.
let getData= hydroRtcClient.gethdf5({dataPath: './data/hdf5/'})
Interfacing and Downloading Data
To download data into the local system, specifically the information
saved in the database, can be done using the downloadData()
function available in the HydroRTCClient object.
To run the server, you can run the following, and click enter:
node .